This is the follow up of my previous post about building a custom Eclipse distribution. In this post I’ll show how to deploy the p2 site and the zipped products on Sourceforge. Concerning the p2 site, I’ll use the same technique, with some modifications, for building a composite update site and deploy it with rsync that I showed on another post.
In particular, we’ll accomplish several tasks:
- creating and deploying the update site with only the features (without the products)
- creating and deploying the update site including product definition and the zipped provisioned products
- creating a self-contained update site (including all the dependencies)
- providing an ant script for installing your custom Eclipse from the net
The code of the example can be found at: https://github.com/LorenzoBettini/customeclipse-example. In particular, I’ll start from where I left in the previous post.
The source code assumes a specific remote directory on Sourceforge, that is part of one of my Sourceforge projects, and it is writable only with my username and password. If you want to test this example, you can simply modify the property remote.dir in the parent pom specifying a local path in your computer (or by passing a value to the maven command with the syntax -Dremote.dir=<localpath>). Indeed, rsync can also synchronize two local directories.
Recall that when you perform a synchronization, specifying the wrong local directory might lead to a complete deletion of that directory. Moreover, source and destinations URLs in rsync have a different semantics depending on whether they terminate with a slash or not, so make sure you understand them if you need to customize this ant file or to pass special URLs.
Creating and Deploying the p2 composite site
This part reuses most of what I showed in the previous posts:
In this blog post we want to be able to add a new p2 site to the composite update site (and deploy it) for two different projects:
- customeclipse.example.site: This is the update site with only our features and bundles
- customeclipse.example.ide.site: This is the update site with our features and bundles and the Eclipse product definition.
To reuse the ant files for managing the p2 composite update site and syncing it with rsync, and the Maven executions that use such ant files, we put the ant files in the parent project customeclipse.example.tycho, and we configure the Maven executions in the pluginManagement section of the parent pom.
We also put in the parent pom all the properties we’ll use for the p2 composite site and for rsync (again, please have a look at the previous posts for their meaning)
<!-- properties for deploying the composite update site and zipped products on Sourceforge -->

<!-- since this is used in the pluginManagement section, we need to make sure
	the path always points to this pom's directory; project.basedir will always point
	to the directory of the pom where the pluginManagement's plugins are used -->
<ant-files-path>${project.basedir}/../customeclipse.example.tycho/ant</ant-files-path>

<!-- the subdirectory for the composite update site -->
<updates.dir>customeclipse</updates.dir>
<site.label>Custom Eclipse Example Site</site.label>

<remote.dir>lbettini,eclipseexamples@frs.sourceforge.net:/home/frs/project/eclipseexamples/customeclipse</remote.dir>

<!-- local source directory of p2 site for rsync -->
<rsync.remote.dir>${remote.dir}/updates/</rsync.remote.dir>
<!-- remote directory of p2 site for rsync -->
<rsync.local.dir>${user.home}/p2.repositories/${updates.dir}/</rsync.local.dir>

<!-- pass "-n" to perform a trial run with no changes made -->
<dryrun></dryrun>
The pluginManagement section contains the configuration for managing the composite update site.
ATTENTION: in the following snipped, for the sake of readability, I split the <appArgLine> into several lines, but in your pom.xml it must be exactly in one (long) line.
<plugin>
	<groupId>org.eclipse.tycho.extras</groupId>
	<artifactId>tycho-eclipserun-plugin</artifactId>
	<version>${tycho-version}</version>
	<configuration>
		<!-- IMPORTANT: DO NOT split the arg line -->
		<appArgLine>
		-application org.eclipse.ant.core.antRunner
		-buildfile ${ant-files-path}/packaging-p2composite.ant
		p2.composite.add
		-Dupdates.dir=${updates.dir}
		-Dsite.label="${site.label}"
		-Dproject.build.directory=${project.build.directory}
		-DunqualifiedVersion=${unqualifiedVersion}
		-DbuildQualifier=${buildQualifier}
		</appArgLine>
		<repositories>
			<repository>
				<id>luna</id>
				<layout>p2</layout>
				<url>http://download.eclipse.org/releases/luna</url>
			</repository>
		</repositories>
		<dependencies>
			<dependency>
				<artifactId>org.eclipse.ant.core</artifactId>
				<type>eclipse-plugin</type>
			</dependency>
			<dependency>
				<artifactId>org.apache.ant</artifactId>
				<type>eclipse-plugin</type>
			</dependency>
			<dependency>
				<artifactId>org.eclipse.equinox.p2.repository.tools</artifactId>
				<type>eclipse-plugin</type>
			</dependency>
			<dependency>
				<artifactId>org.eclipse.equinox.p2.core.feature</artifactId>
				<type>eclipse-feature</type>
			</dependency>
			<dependency>
				<artifactId>org.eclipse.equinox.p2.extras.feature</artifactId>
				<type>eclipse-feature</type>
			</dependency>
			<dependency>
				<artifactId>org.eclipse.equinox.ds</artifactId>
				<type>eclipse-plugin</type>
			</dependency>
		</dependencies>
	</configuration>
	<executions>
		<execution>
			<id>add-p2-composite-repository</id>
			<phase>package</phase>
			<goals>
				<goal>eclipse-run</goal>
			</goals>
		</execution>
	</executions>
</plugin>
The pluginManagement section also contains the configuration for updating and committing the composite update site to Sourceforge.
<plugin>
	<artifactId>maven-antrun-plugin</artifactId>
	<version>${maven-antrun-plugin.version}</version>
	<executions>
		<execution>
			<id>update-local-repository</id>
			<phase>prepare-package</phase>
			<configuration>
				<target>
					<ant antfile="${ant-files-path}/rsync.ant" target="rsync-update">
					</ant>
				</target>
			</configuration>
			<goals>
				<goal>run</goal>
			</goals>
		</execution>

		<execution>
			<id>deploy-repository</id>
			<phase>verify</phase>
			<configuration>
				<target>
					<ant antfile="${ant-files-path}/rsync.ant" target="rsync-commit">
					</ant>
				</target>
			</configuration>
			<goals>
				<goal>run</goal>
			</goals>
		</execution>
	</executions>
</plugin>
Now, we can simply activate such plugins in the build sections of our site projects described above.
In particular, we activate such plugins only inside profiles; for example, in the customeclipse.example.site project we have:
<profiles>
	<profile>
		<id>release-composite</id>
		<activation>
			<activeByDefault>false</activeByDefault>
		</activation>

		<build>
			<plugins>
				<plugin>
					<!-- this is configured in pluginManagement section of the parent pom -->
					<groupId>org.eclipse.tycho.extras</groupId>
					<artifactId>tycho-eclipserun-plugin</artifactId>
				</plugin>
			</plugins>
		</build>
	</profile>

	<profile>
		<id>deploy-composite</id>
		<activation>
			<activeByDefault>false</activeByDefault>
		</activation>

		<build>
			<plugins>
				<plugin>
					<!-- this is configured in pluginManagement section of the parent pom -->
					<artifactId>maven-antrun-plugin</artifactId>
				</plugin>
			</plugins>
		</build>
	</profile>
</profiles>
In customeclipse.example.ide.site we have similar sections, but the profiles are called differently, release-ide-composite and deploy-ide-composite, respectively.
So, if you want to update the p2 composite site with a new version containing only the features/bundles and deploy it on Sourceforge you need to run maven as follows
mvn clean verify -Prelease-composite -Pdeploy-composite
If you want to do the same, including the custom product definitions you need to run maven as follows (the additional build-ide profile is required because the customeclipse.example.ide.site is included as a Maven module only when that profile is activated; this way, products are created only when that profile is activated – just because provisioning a product requires some time and we don’t want to do that on normal builds)
mvn clean verify -Pbuild-ide -Prelease-ide-composite -Pdeploy-ide-composite
NOTE: The remote directory on Sourceforge hosting the composite update site will always be the same. This means that the local composite update site created and updated by both deploy-composite and deploy-ide-composite will be synchronized with the same remote folder.
In the customeclipse.example.ide.site, we added a p2.inf file with touchpoint instructions to add as update site in our Eclipse products the update site hosted on Sourceforge: http://sourceforge.net/projects/eclipseexamples/files/customeclipse/updates.
Deploying the zipped products
To copy the zipped products on Sourceforge we will still use rsync; actually, we won’t use any synchronization features: we only want to copy the zip files. I could have used the Ant Scp or Sftp tasks, but I experienced many problems with such tasks, so let’s use rsync also for that.
The ant file for rsync is slightly different with respect to the one shown in the previous post, since it has been refactored to pass the rsync macro more parameters. We still have the targets for update/commit synchronization; we added another target that will be used to simply copy something (i.e., the zipped products) to the remote directory, without any real synchronization. You may want to have a look at rsync documentation to fully understand the command line arguments.
<project name="Rsync from Ant" basedir=".">

	<!-- remote rsync host -->
	<!-- <property name="rsync.remote.dir" value="lbettini,eclipseexamples@frs.sourceforge.net:/home/frs/project/eclipseexamples/customeclipse/updates/"/> -->

	<!-- local directory for rsync -->
	<!-- <property name="rsync.local.dir" value="${user.home}/p2.repositories/updates/"/> -->

	<!-- pass "-n" to perform a trial run with no changes made -->
	<property name="dryrun" value="-n"/>

	<target name="rsync-update">
		<rsync source="${rsync.remote.dir}" dest="${rsync.local.dir}" />
	</target>

	<target name="rsync-commit">
		<rsync source="${rsync.local.dir}" dest="${rsync.remote.dir}" />
	</target>

	<!-- just copy contents of the source directory without recursion and without removal -->
	<target name="rsync-copy-dir-contents">
		<rsync source="${rsync.local.dir}" dest="${rsync.remote.dir}"
		delete="" filter="--filter='- /*/'"/>
	</target>

	<!-- = = = = = = = = = = = = = = = = =
          macrodef: rsync
         = = = = = = = = = = = = = = = = = -->
	<macrodef name="rsync">
		<attribute name="source" />
		<attribute name="dest" />
		<attribute name="recursive" default="-a" />
		<attribute name="delete" default="--delete" />
		<attribute name="filter" default="" />
		<sequential>
			<echo message="Rsync source:" />
			<echo message="@{source}" />
			<echo message="Rsync destination:" />
			<echo message="@{dest}" />
			<echo message="dryrun: ${dryrun}" />
			<echo message="recursive: @{recursive}" />
			<echo message="delete: @{delete}" />
			<echo message="filter: @{filter}" />
			<exec dir="." executable="rsync">
				<arg line="@{recursive}" />

				<arg line="@{delete}" />

				<arg line="@{filter}" />

				<arg value="-zvc" />

				<!-- exclude all hidden files and directories -->
				<arg line="--exclude='.*'" />

				<!-- use ssh -->
				<arg line="-e ssh" />

				<arg line="${dryrun}" />

				<!-- source for the rsync -->
				<arg line="@{source}" />

				<!-- destination for rsync -->
				<arg value="@{dest}" />
			</exec>
		</sequential>
	</macrodef>

</project>
In the customeclipse.example.ide.site, in the deploy-ide-composite profile, we configure another execution for the maven ant plugin (recall that in this profile the rsync synchronization configured in the parent’s pom pluginManagement section is also executed); this further execution will copy the zipped products to a remote folder on Sourceforge (as detailed in the previous post, you first need to create such folder using the Sourceforge web interface):
<profile>
	<id>deploy-ide-composite</id>
	<activation>
		<activeByDefault>false</activeByDefault>
	</activation>

	<build>
		<plugins>
			<plugin>
				<!-- this is configured in pluginManagement section of the parent pom -->
				<artifactId>maven-antrun-plugin</artifactId>

				<!-- and we add the execution for copying zipped products -->
				<executions>
					<execution>
						<id>deploy-ides</id>
						<phase>verify</phase>
						<configuration>
							<target>
								<ant antfile="${ant-files-path}/rsync.ant"
											target="rsync-copy-dir-contents">
									<property name="rsync.remote.dir"
									value="${remote.dir}/products/"/>
									<property name="rsync.local.dir"
									value="${project.build.directory}/products/"/>
								</ant>
							</target>
						</configuration>
						<goals>
							<goal>run</goal>
						</goals>
					</execution>
				</executions>
			</plugin>
		</plugins>
	</build>
</profile>
Note that when calling the rsync-copy-dir-contents of the rsync.ant file, we pass the properties as nested elements, in order to override their values (such properties’ value are already defined in the parent’s pom, and for this run we need to pass different values).
Now, if we run
mvn clean verify -Pbuild-ide -Prelease-ide-composite -Pdeploy-ide-composite
many things will be executed:
- rsync will synchronize our local composite update site with the remote composite update site
- a new p2 site will be created, and added to our local composite update site
- rsync will synchronize our local changes with the remote composite update site
- Eclipse products will be created and zipped
- the zipped products will be copied to Sourceforge
A self-contained p2 repository
Recall from the previous post that since in customeclipse.example.ide.feature we added Eclipse features (such as the platform and jdt) as dependencies (and not as included features), then the p2 update site we’ll create will not contain such features: it will contain only our own features and bundles. And that was actually intentional.
However, this means that the users of our features and of our custom Eclipse will still need to add the standard Eclipse update site before installing our features or updating the installed custom Eclipse.
If you want your p2 repository to be self-contained, i.e., to include also the external dependencies, you can do so by setting includeAllDependencies to true in the configuration of the tycho-p2-repository-plugin.
It makes sense to do that in the customeclipse.example.ide.site, so that all the dependencies for our custom Eclipse product will end up in the p2 repository:
<profiles>
	<profile>
		<id>release-ide-composite</id>
		<activation>
			<activeByDefault>false</activeByDefault>
		</activation>

		<properties>
			<!-- set it to true to have a self contained p2 repository https://wiki.eclipse.org/Tycho/eclipse-repository#Creating_a_self-contained_p2_repository -->
			<includeAllDependencies>false</includeAllDependencies>
		</properties>

		<build>
			<plugins>
				<plugin>
					<groupId>org.eclipse.tycho</groupId>
					<artifactId>tycho-p2-repository-plugin</artifactId>
					<version>${tycho-version}</version>
					<configuration>
						<includeAllDependencies>${includeAllDependencies}</includeAllDependencies>
					</configuration>
				</plugin> ...
However, doing so every time we add a new p2 update site to the composite update site would make our composite update site grow really fast in size. A single p2 repository for this example, including all dependencies is about 110Mb. A composite update site with just two p2 repositories would be 220Mb, and so on.
I think a good rule of thumb is
- include all dependencies the first time we release our product’s update site (setting the property includeAllDependencies to true, and then setting it to false right after the first release)
- for further releases do not include dependencies
- include the dependencies again when we change the target platform of our product (indeed, Tycho will take the dependencies from our target platform)
Provide a command line installer
Now that our p2 composite repository is on the Internet, our users can simply download the zip file according to their OS, unzip it and enjoy it. But we could also provide another way for installing our custom Eclipse: an ant file so that the user will have to
- Have Ant installed on the computer
- Download the ant file (in this example it can be downloaded from https://raw.githubusercontent.com/LorenzoBettini/customeclipse-example/master/customeclipse.example.tycho/install.ant)
- and run it as “ant -f install.ant”
The ant file will use the p2 director command line application to install our Eclipse product directly from the remote update site (the ant file is self-contained since if the director application is not already installed, it will install it as the first task).
Here’s the install.ant file (note that we ask the director to install our custom Eclipse product, customeclipse.example.ide and, explicitly, the main feature customeclipse.example.feature; this reflects what we specified in the product configuration, in particular, the fact that customeclipse.example.feature must be a ROOT feature, so that it can be updatable – see all the details in the previous post)
<!--
	author: Lorenzo Bettini
-->
<project name="Install Custom Eclipse" default="install.customeclipse">

	<property name="eclipse.dest"
		location="${user.home}/customeclipse" />
	<property name="update.sites"
		value="http://sourceforge.net/projects/eclipseexamples/files/customeclipse/updates/" />
	<property name="product.profile"
		value="CustomEclipse" />
	<property name="install.features"
		value="customeclipse.example.ide,customeclipse.example.feature.feature.group" />

	<property name="director.install.dest" location="${user.home}" />
	<property name="director.dir" location="${director.install.dest}/director" />
	<property name="director.url"
		value="http://download.eclipse.org/tools/buckminster/products/director_latest.zip" />

	<target name="install.customeclipse">
		<antcall target="install.p2.director" />
		<echo message="" />
		<echo message="Installing Eclipse into ${eclipse.dest}..." />
		<java fork="true" dir="${director.dir}" logError="true" classname="org.eclipse.core.launcher.Main" failonerror="true">
			<sysproperty key="eclipse.p2.mirrors" value="false" />
			<classpath>
				<fileset dir="${director.dir}/plugins">
					<include name="org.eclipse.equinox.launcher_*.jar" />
				</fileset>
			</classpath>
			<arg line='-data "${director.dir}/workspace"' />
			<arg line="-r ${update.sites}" />
			<arg line='-d "${eclipse.dest}"' />
			<arg line="-p ${product.profile}" />
			<arg line="-i ${install.features}" />
			<arg line="-profileProperties org.eclipse.update.install.features=true" />
			<arg line="-roaming" />
		</java>
	</target>

	<target name="install.p2.director">
		<condition property="p2.director.installed">
			<available file="${director.dir}" />
		</condition>
		<antcall target="install.p2.director.internal" />
	</target>

	<target name="install.p2.director.internal" unless="p2.director.installed">
		<echo message="" />
		<echo message="Installing director from ${director.url}..." />
		<tempfile destdir="${java.io.tmpdir}"
			prefix="director-"
			suffix=".zip"
			property="director.zip"
			deleteonexit="true" />
		<get src="${director.url}" dest="${director.zip}" />
		<unzip src="${director.zip}" dest="${director.install.dest}" />
		<chmod file="${director.install.dest}/director/director" perm="+x" />
		<delete file="${director.zip}" />
	</target>
</project>
Note that this will always install the latest version present in the remote composite update site.
For instance, consider that you created zipped products for version 1.0.0, then you deployed a small upgrade only for your features, version 1.0.1, i.e., without releasing new zipped products. The ant script will install the custom Eclipse including version 1.0.1 of your features.
Some experiments
You may want to try and download the zipped product for your OS from this URL: https://sourceforge.net/projects/eclipseexamples/files/customeclipse/products/
After I deployed the self-contained p2 repository and the zipped products (activating the profiles release-ide-composite and deploy-ide-composite, with the property includeAllDependencies set to true, using the project customeclipse.example.ide.site), I deployed another p2 repository into the composite site only for the customeclipse.example.feature (activating the profiles release-composite and deploy-composite, i.e., using the project customeclipse.example.site).
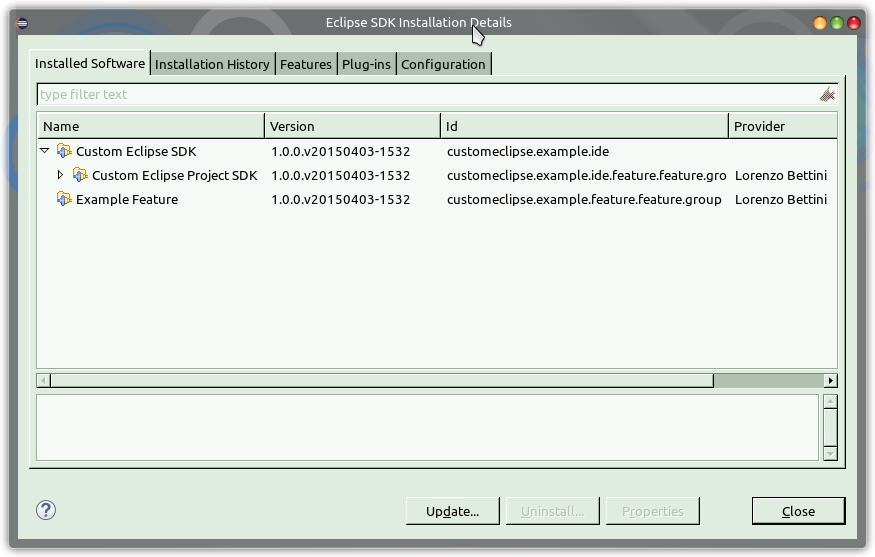
Unzip the downloaded product, and check for updates (recall that the product is configured with the update site hosted on Sourceforge, through the p2.inf file described before). You will find that there’s an update for the Example Feature:

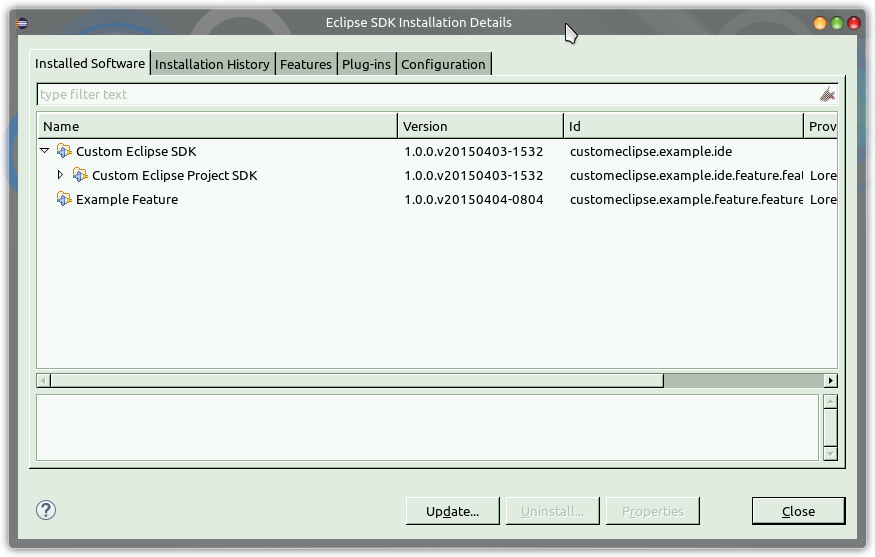
After the upgrade and restart you should see the new version of the feature installed:
Now, try to install the product using the ant file shown above, that can be downloaded from https://raw.githubusercontent.com/LorenzoBettini/customeclipse-example/master/customeclipse.example.tycho/install.ant.
ant -f install.ant
You’ll have to wait a few minutes (and don’t worry about cookie warnings); run this version of the custom Eclipse, and you’ll find no available updates: check the installation details and you’ll see you already have the latest version of the Example Feature.
That’s all! Hope you find this post useful and… Happy Easter 

